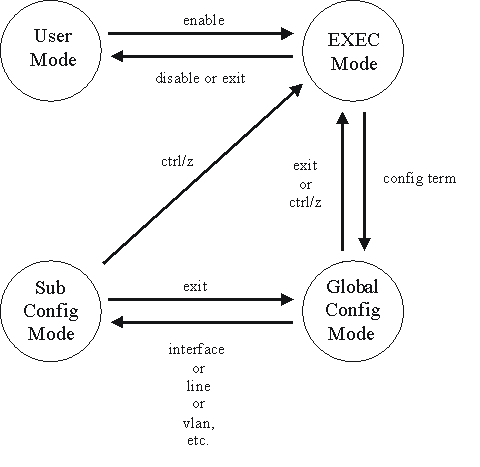
IOS or switch accessing modes are steps to access and work on switch.
These are three and listed below
1. user Mode
2. privilege Mode
3. configuration mode
1. user Mode
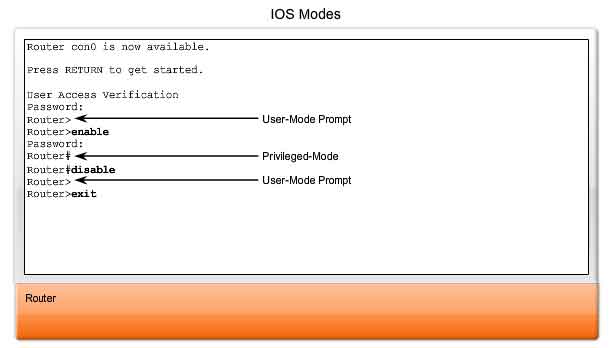
User mode in initial stand by mode in which we can see user information. The syntax of the user mode is “switch>”
2. privilege Mode:
This is the second and middle mode, in which we can enter by commend “enable” from user mode. Here we can give commend such like copy, save, show or view the configuration of the switch. The syntax of the privilege mode is “switch#”
3. Configuration Mode:
Configuration mode is the central mode and all the configuration is take place here. And we enter from privilege mode to configuration mode by commend “configure terminal” and the syntax is “switch(configure)#”.
Method of Accessing Switch IOS:
1. Direct Access through Console port
2. Access through LAN by Telnet
3. SSH (source socket shell)application
Step1. Direct access through console port
After physical connectivity
Open hyper terminal application as, start—programs—accessories—- communication—-Hyper terminal.
Give any name to the session
Select 9600 speed
Select COM port either COM-I or COM-II (this will open commend line interface window)
Host Name Configuration:
Switch> enable
Switch# config t
Switch(config)# hostname inam
Inam(config)# exit
Inam#
To Set system Clock, Date and Time on Switch or Router:
Router>enable
Router# clock set 08:50:25 2 Dec 2008
How give password to different modes of switch:
Switch>
Switch >enable
Switch#
Switch #configure terminal
Switch(configure)# line console 0
Switch(config-line)#password ccna Console Port password
Switch(config-line)#login
Switch(config-line)#exit
Switch(configure)#
Switch(configure)#line vty 0
Switch(config-line)#password inara Virtual terminal password
Switch(config-line)#exit
Switch(configure)#
Switch(configure)#enable password mcse——————Privilege mode password
How to show / view the configuration of switch:
Switch# show running-configure
How to save these configurations:
For saving different commends and configuration is
Switch# Copy running-configure startup-configure OR
Switch# write mem
How to encrypt the password
Switch(configure)# service password-encryption
How to remove the Password
To remove the console password as
Switch(configure)#line console 0
Switch(config-line)#no password
Switch(config-line)#exit
Switch(configure)#
Now to remove the privilege mode password
Switch(configure)#no enable password
Now to remove the virtual terminal password
Switch(configure)#line vty 0
Switch(config-line)#no password
Switch(config-line)#exit
Switch(configure)#
And save it
To show these configurations:
Switch# show running-configure
Password recovery
If we loss the password or other some thing happen then we can recover our password as
Turn off the switch
Then Turn on the switch
Hold/Press the mode button of the switch for a few seconds until it enter in mini IOS as “switch:”
Initialized the flash memory as
Switch: flash-init
The password are laying in config directory so delete it as
Switch: del flash:config.old
Switch: Y (for confirmation press Y for yes)
Switch: rename flash:config.text flah:fonfig.old
For checking the directory
Switch: dir flash:/
And now boot the IOS as
Switch: boot
And enter to configuration mode and remove the password and save it as
Switch> enable
Switch# configure terminal
Switch(config)# line cons 0
Switch(config)# no password
Switch (config)# exit
Switch #
Switch # copy running-configure startup-configure or “write mem”
Step2. Access through Telnet
To access the IOS of switch from LAN
Privilege and virtual terminal password is must.
Then do the configuration as
Switch>enable
Switch# conf terminal
Switch(configure)# interface vlan 1
Switch(configure-if)# ip address 192.168.0.10 255.255.255.0
Switch(configure-if)# no shut
Switch(configure-if)#exit
Now go to the client computer and do as. Start—-run— give the CMD in run
C:/> telnet 192.168.0.10 and press enter
It prompt for vty password then
Switch> enable
Now it will prompt for console password give it and it will enter to privilege mode as
Switch#
Switch# configure terminal ( for configuration on switch by virtual terminal)
MAC Address Table:
For showing MAC address table as
Switch# Show mac-add-table
And to show the aging time of the mac-add-table as
Switch# Show mac-add-table aging-time
Requirement for entering addresses statically to MAC address table
MAC address of the computer
Port no of that computer is to be used
Switch> enable
Switch# configure terminal
Switch(configure)# mac-add-table static 0052.45b5.2g52(mac address) int fa 0/1(port no) vlan 1
If we want that to take the mac address automatically we use the work “sticky” for mac address as
Switch(configure)# mac-add-table static sticky int fa 0/1 vlan 1
If we want to remove it from table as
Switch(configure)# no mac-add-table static 0052.45b5.2g52 int fa 0/1 vlan 1 and save it as
Switch# write mem
Your purchase with Ciscoforall is safe and fast.
Your Learning Solution will be available for immediate download after your payment has been received.
 |  |