What is a VLAN?
According to IT Portal (2002), a Virtual Local Area Network (VLAN) may be defined as a group of LANs that have different physical connections, but which communicate as if they are connected on a single network segment. VLANs were created because IT administrators realised that there was a need for a network segmenting solution, since network traffic increases with network size.
VLANs increase overall network performance by grouping users and resources that communicate most frequently with each other. This means that the use of unicast or broadcast data transmission is limited, and traffic is reduced. It is a software based solution and allows IT administrators to adapt to networking changes.
Advantages of VLANs
VLANs provide the following advantages:
- Ease of administration
VLANs enable logical grouping of end-stations that are physically dispersed on a network. When users on a VLAN move to a new physical location but continue to perform the same job function, the end-stations of those users do not need to be reconfigured. Similarly, if users change their job function, they need not physically move: changing the VLAN membership of the end-stations to that of the new team makes the users’ end-stations local to the resources of the new team.
- Confinement of broadcast domains
VLANs reduce the need to have routers deployed on a network to contain broadcast traffic. Flooding of a packet is limited to the switch ports that belong to a VLAN.
- Reduction in network traffic
As a result of confinement of broadcast domains on a network, traffic on the network is significantly reduced.
- Enforcement of security policies
By confining the broadcast domains, end-stations on a VLAN can be isolated from listening to or receiving broadcasts not intended for them. Moreover, if a router is not connected between the VLANs, the end-stations of a VLAN cannot communicate with the end-stations of the other VLANs.
Types of VLANs
According to Intel Corporation (2002), in general, there are three basic models for determining and controlling how a packet gets assigned to a VLAN.
Port-based VLANs
In this implementation, the administrator assigns each port of a switch to a VLAN. For example, ports 1-3 might be assigned to the Sales VLAN, ports 4-6 to the Engineering VLAN and ports 7-9 to the Administrative VLAN (see Figure 4). The switch determines the VLAN membership of each packet by noting the port on which it arrives.
When a user is moved to a different port of the switch, the administrator can simply reassign the new port to the user’s old VLAN. The network change is then completely transparent to the user, and the administrator saves a trip to the wiring closet. However, this method has one significant drawback. If a repeater is attached to a port on the switch, all of the users connected to that repeater must be members of the same VLAN.
MAC address-based VLANs
The VLAN membership of a packet in this case is determined by its source or destination MAC address. Each switch maintains a table of MAC addresses and their corresponding VLAN memberships. A key advantage of this method is that the switch doesn’t need to be reconfigured when a user moves to a different port.
However, assigning VLAN membership to each MAC address can be a time consuming task. Also, a single MAC address cannot easily be a member of multiple VLANs. This can be a significant limitation, making it difficult to share server resources between more than one VLAN. (Although a MAC address can theoretically be assigned to multiple VLANs, this can cause serious problems with existing bridging and routing, producing confusion in switch forwarding tables.)
Layer 3 (or protocol)-based VLANs
With this method, the VLAN membership of a packet is based on protocols (IP, IPX, NetBIOS, etc.) and Layer 3 addresses. This is the most flexible method and provides the most logical grouping of users. An IP subnet or an IPX network, for example, can each be assigned their own VLAN. Additionally, protocol-based membership allows the administrator to assign non-routable protocols, such as NetBIOS or DECnet, to larger VLANs than routable protocols like IPX or IP. This maximizes the efficiency gains that are possible with VLANs.
Another important distinction between VLAN implementations is the method used to indicate membership when a packet travels between switches. Two methods exist — implicit and explicit.
Implicit
VLAN membership is indicated by the MAC address. In this case, all switches that support a particular VLAN must share a table of member MAC addresses.
Explicit
A tag is added to the packet to indicate VLAN membership. Cisco ISL and the IEEE 802.1q VLAN specifications both use this method.
To summarize, when a packet enters its local switch, the determination of its VLAN membership can be port-based, MAC-based or protocol-based. When the packet travels to other switches, the determination of VLAN membership for that packet can be either implicit (using the MAC address) or explicit (using a tag that was added by the first switch). Port-based and protocol-based VLANs use explicit tagging as their preferred indication method. MAC-based VLANs are almost always implicit.
The bottom line is that the IEEE 802.1q specification is going to support port-based membership and explicit tagging, so these will be the default VLAN model in the future.
Requirements to set up VLANs
The following requirements must be satisfied before setting up VLANs in a network:
- The switches deployed in the network either must comply with IEEE 802.1Q standards or must have a vendor-specific implementation of VLANs.
- For an end-station to support multiple VLANs, it must be able to dynamically register or must be statically configured to belong to a VLAN.
If an end-station cannot register or cannot be configured to belong to a VLAN, the end-station can belong only to one VLAN. This VLAN is configured on the switch port to which the end-station connects.
Communication in a VLAN explained
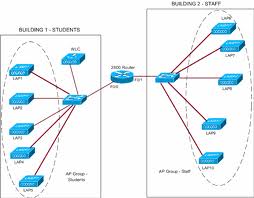
When a computer on a VLAN sends packets, they are only flooded to the members of the VLAN. If there is communication between VLANs, then the packets will need to go through a router. The diagram on the next page illustrates how communication occurs between geographically dispersed VLAN members. Here, VLAN 10 (Engineering), VLAN 20 (Marketing), and VLAN 30 (Finance) span three floors of a building. If a member of VLAN 10 on Floor 1 wants to communicate with a member of VLAN 10 on Floor 3, the communication occurs without going through the router, and packet flooding is limited to port 1 of Switch 2 and Switch 3 even if the destination MAC address to Switch 2 and Switch 3 is not known.
| Communication in a VLAN (Source : Network Applicance Inc (2001) |
Creating the VLAN
After all the hardware connections are in place, then the VLAN can be created. First, the user will need to log onto the switch using telnet or SSH in order to access the switch’s Command Line Interface (CLI). If the user is lucky, the switch may contain an easy-to-use menu system for managing the switch. This essay will describe how to create a VLAN using the not-so-friendly CLI. Cisco’s Command Reference (1998) was used for assistance.
After logging on to the switch, the user will have to enter administrative mode. This can be done by typing enable at the command prompt as shown below. The system will request for a password and this should be given.
[ South Rack, Centre of Excellence, Rhodes University ]# Use of this computer system is restricted to authorized users. #
# All other users will be prosecuted to the full extent of the law. #
User Access Verification
Password:
cat2.ict>enable
Password:
cat2.ict#
To create a VLAN, the system must be in vlan mode. To enter vlan mode, the user must type vlan database at the prompt as shown below :
cat2.ict#vlan database
cat2.ict(vlan)#
If the user wants to create a VLAN named Fari which is assigned the number 20 then he must type vlan 20 name Fari. This should be followed by the exit command, to apply the changes. The output appears as follows:
cat2.ict(vlan)#vlan 20 name Fari
VLAN 20 modified:
Name: Fari
type exit to save the changes
cat2.ict(vlan)#exit
APPLY completed.
Exiting….
cat2.ict#
The user can then view the VLAN that he has created by typing show vlan :
cat2.ict#show vlan
VLAN Name Status Ports
—- ——————————– ——— ——————————-
1 default active Fa0/1, Fa0/2, Fa0/3, Fa0/4,
Fa0/5, Fa0/6, Fa0/7, Fa0/8,
Fa0/9, Fa0/10, Fa0/11, Fa0/12,
Fa0/13, Fa0/14, Fa0/15, Fa0/16,
Fa0/17, Fa0/18, Fa0/19, Fa0/20,
Fa0/21, Fa0/22, Fa0/23, Fa0/24
2 DragonsCave active
3 Mya active
5 Honours1 active
10 VLAN0010 active
13 GraemesSpot active
14 NiksVlan suspended
16 Paddington active
18 Jasmine suspended
20 Fari active
69 Imarx’sVlan active
70 Uma active
1002 fddi-default active
1003 token-ring-default active
1004 fddinet-default active
1005 trnet-default active
VLAN Type SAID MTU Parent RingNo BridgeNo Stp BrdgMode Trans1 Trans2
—- —– ———- —– —— —— ——– —- ——– —— ——
1 enet 100001 1500 – – – – – 1002 1003
2 enet 100002 1500 – – – – – 0 0
3 enet 100003 1500 – – – – – 0 0
5 enet 100005 1500 – – – – – 0 0
10 enet 100010 1500 – – – – – 0 0
13 enet 100013 1500 – – – – – 0 0
14 enet 100014 1500 – – – – – 0 0
16 enet 100016 1500 – – – – – 0 0
18 enet 100018 1580 – – – – – 0 0
20 enet 100020 1500 – – – – – 0 0
69 enet 100069 1500 – – – – – 0 0
70 enet 100070 1500 – – – – – 0 0
1002 fddi 101002 1500 – – – – – 1 1003
1003 tr 101003 1500 1005 0 – – srb 1 1002
1004 fdnet 101004 1500 – – 1 ibm – 0 0
1005 trnet 101005 1500 – – 1 ibm – 0 0
Maintaining the VLAN
If the user wants to make any changes, he can follow the same steps above, and the changes will overwrite the old configuration. To delete a VLAN, the user needs to enter VLAN mode using vlan database and then type no vlan # where # represents the number of the VLAN to be deleted.
Conclusion
It can be seen that creating and managing a VLAN can be quite a complex task. The LAN administrator needs to have a clear understanding about how VLANs work and he must know the commands needed in order to configure and set up the switches in his network.
Your purchase with Ciscoforall is safe and fast.
Your Learning Solution will be available for immediate download after your payment has been received.
 |  |